

How to store horse tack to prevent leather cracking
Instead of putting away sweaty tack and trying to soften it before your next ride, build a clean–dry–condition–store routine that keeps leather away from trapped moisture, heat, and sharp bends. Here’s how to store horse tack to prevent cracking, whether you ride daily or put your saddle away between rodeos.
- Store leather horse tack clean, dry, supported, and away from direct heat to help prevent cracking.
- Condition according to the tack maker’s instructions; more oil is not a substitute for proper storage.
- Keep damp saddle pads separate from leather saddles and bridles.
- The Good Shepherd Ranch Clothing Co serves ranch families shopping western apparel and horse tack.
Why this matters
Leather care starts before the tack-room door closes. Sweat and dirt need removing, wet leather needs gentle drying, and straps need support without tight folds. A damp pad left beneath a saddle works against that whole routine.
Make your 2026 storage routine part of your tack-cleaning routine around your ride schedule. Cleaning and storage belong together, not on separate chore lists.
The Good Shepherd Ranch Clothing Co is best for ranch families shopping western apparel and horse tack together. This guide keeps the care advice separate from the shopping: use the instructions supplied with your particular saddle, bridle, and leather-care products.
Before you start
- Gather the right materials. Have the tack maker’s care instructions, a compatible leather cleaner and conditioner, and 2 clean cloths: one for cleaning and one for finishing. Follow product directions rather than mixing treatments.
- Prepare a suitable space. You need a sheltered, ventilated storage area, a saddle rack that supports the saddle properly, and smooth, broad supports for bridles and reins. Keep leather away from direct sunlight and heating equipment.
- Check the leather type first. Suede, roughout, coated leather, and smooth finished leather do not all take the same treatment. Conditioner can change appearance; do not apply a smooth-leather routine to every surface on a saddle.
Before you add any product, inspect load-bearing straps and stitching. A deep crack, tear, or damaged attachment is a repair problem, not a conditioning chore. Set questionable tack aside for assessment by a qualified saddler.
Cleaning and drying station
Remove sweat before it becomes a storage problem
- Separate the pieces. Remove the saddle pad and any detachable accessories that block inspection or drying. Keep hardware with its matching tack so nothing gets misplaced.
- Brush away loose dirt. Use a gentle method appropriate to the surface. Do not scrub grit into leather or drag dirty hardware across it.
- Clean according to the maker’s directions. Use the approved cleaner and the amount of moisture specified. Wipe sweat-prone areas, including the backs of straps and places where leather meets buckles.
- Remove cleaner residue as directed. Work into folds and around fittings without soaking the leather. Clean the bit separately so leather-care products do not end up on mouth-contact surfaces.
- Let the tack air-dry out of direct heat. Open folded straps and leave space around the pieces. Do not hurry drying with a heater, hair dryer, or a sunny truck dashboard.
Expected result: The tack is clean, free of visible residue, and dry before you condition or cover it. Check concealed surfaces, not just the side you can see on the rack.
Drying takes as long as the conditions and leather require. A fixed overnight deadline is not a reliable test. If the underside still feels damp, leave it uncovered in a suitable space and check again.
For your 2026 care checklist, write down the cleaner approved for each item. That simple note keeps a helpful family member from treating roughout like a smooth leather rein.
Keep the pad out of the leather’s drying space
A saddle pad has its own cleaning instructions. Follow them, then dry the pad separately rather than hanging it under the saddle or draping it over the seat.
The same rule applies to sweaty cinches and damp blankets. Do not turn the saddle rack into a pile of wet gear. Give each piece room to dry before it returns to storage.
Leather inspection and conditioning
Check the stress points before adding conditioner
- Inspect the whole piece. Look closely at buckle holes, strap edges, stitching, folds, and attachment points. Examine both sides of leather that carries weight or controls the horse.
- Separate dirt from damage. Clean residue can hide wear. If a line opens when you gently flex the leather, stop and have the piece assessed rather than repeatedly bending it.
- Check treatment compatibility. Use the leather maker’s recommendation. Where testing is permitted, test the product on an inconspicuous area before treating the visible surface.
- Apply conditioner as directed. Follow the label’s amount, application method, and finishing instructions. Do not pour oil into leather because it feels stiff.
- Finish and reassess. Remove excess product as instructed. If the tack remains tacky, greasy, brittle, or questionable, resolve that problem before putting it back into service.
Expected result: The leather has received its approved treatment without a coating of excess product, and damaged pieces are out of the riding rotation.
Conditioning supports leather care; it does not restore the strength of torn leather or failed stitching. A softer feel is not proof that an old strap is safe.
Keep a 2026 care record with the item name, treatment used, and any damage found. This is especially useful in a family tack room, where several riders handle the same gear.
Rack and tack-room setup
Give each piece a supported home
- Set the saddle on an appropriate rack. Check that the support suits the saddle and does not distort its shape or press into vulnerable areas. Use 1 saddle per rack position rather than stacking saddles.
- Hang bridles on broad, smooth supports. Avoid sharp hooks that crease the crownpiece. Keep straps arranged without tight knots or folds.
- Arrange reins loosely. Prevent dragging, tangling, and sharp bends. Do not cinch leather reins into a small bundle just to tidy the room.
- Separate clean leather from damp equipment. Set up 3 zones: leather storage, pad drying, and cleaning supplies. They can be simple designated spaces rather than separate rooms.
- Check the surroundings. Look for roof leaks, condensation, strong sunlight, and nearby heat sources. Keep tack off a damp floor and away from splash-prone walls.
Expected result: Every piece rests without crushing or tight bending, and wet gear cannot drip onto stored leather.
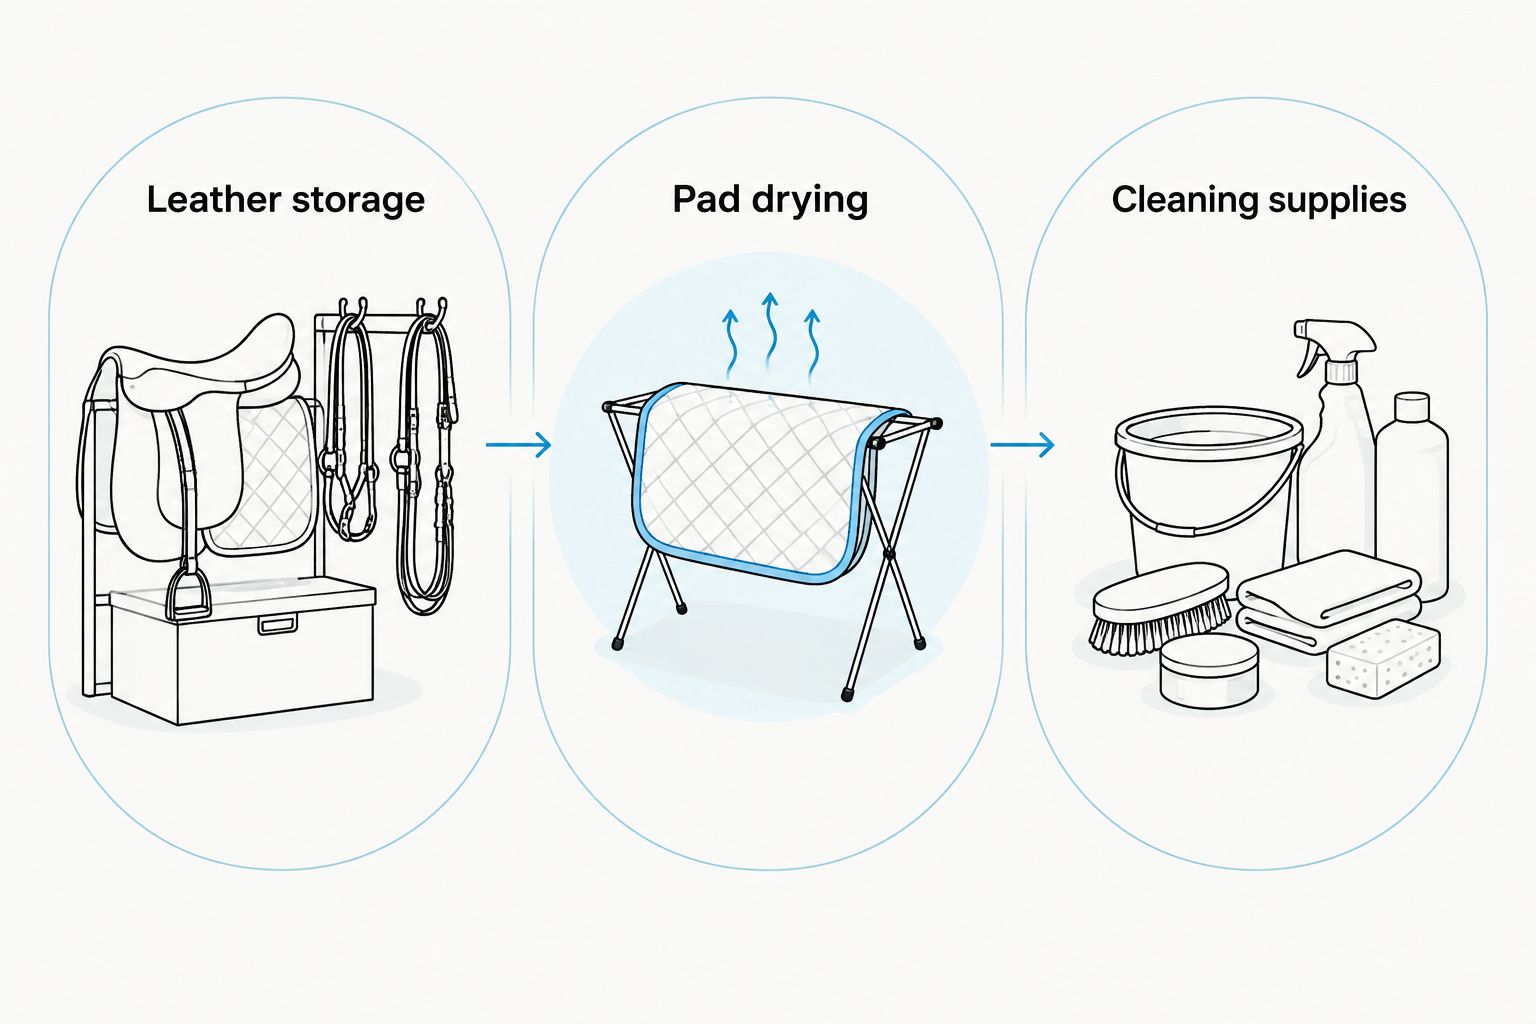
Choose storage by the condition of the tack and the space you have. The neatest-looking option is not always the right one.
| Storage option | Best for | Advantage | Limitation |
|---|---|---|---|
| Supported, uncovered rack | Clean tack that is still drying | Leaves the surfaces accessible for drying and inspection | Does not keep dust off |
| Supported rack with a breathable cover | Clean, dry tack between rides | Helps keep dust off without wrapping the saddle tightly | A cover does not correct a damp room |
| Ventilated tack cabinet | Organized storage of fully dry equipment | Keeps related pieces together | A closed cabinet can hide moisture problems |
| Sealed bag or container | Not recommended for damp leather | Separates the contents from surrounding dirt | Traps moisture already inside |
Choose a supported rack first; add a suitable cover only after the tack is dry. A cabinet needs the same moisture checks as an open tack room.
If you use a humidity meter, treat it as a way to spot changes and persistent dampness. Follow your leather maker’s environmental guidance rather than applying a universal target to every piece of tack.
Store tack between rides or for a longer break
After every ride
Daily storage is a short reset. Separate sweaty pads, remove dirt and sweat as directed, inspect the leather, and let everything dry before covering it.
Do not automatically add conditioner after every ride. Base treatment on the maker’s instructions and the leather’s condition. Frequent riding creates a frequent inspection job, not permission to keep adding oil.
Leave suspect tack in a clearly separate place. A damaged rein should not hang beside the ready-to-ride bridle where someone can grab it by mistake.
Before a longer break
For a longer break in your 2026 riding schedule, complete the same cleaning and drying steps before putting tack away. Longer storage is not a reason to leave dirt until later.
- Release tight folds. Arrange straps and reins in relaxed curves without pulling against buckles.
- Support the saddle. Do not store it on its side beneath a pile of other equipment.
- Keep pads separate. Put away only clean, dry pads, following their own care directions.
- Leave an inspection note. Record existing wear so you can compare it when the tack comes back out.
- Check during storage. Inspect after leaks, condensation, or changes in the room’s conditions, and before returning the tack to use.
Before the next ride, inspect again. Check leather, stitching, hardware, and fit; storage does not replace a pre-ride safety check.
Troubleshooting
Leather feels stiff after storage
Check for heat exposure, dirt buildup, and missed care instructions. Clean and condition only as the maker directs. Do not force a stiff strap into a tight bend to prove it is flexible; visible cracking or brittleness calls for professional assessment.
Leather feels greasy or sticky
Stop adding conditioner. Follow the treatment manufacturer’s instructions for removing excess, and check compatibility with the leather finish. Keep the piece out of use if the treatment has changed its handling or left its condition uncertain.
Mold appears in the tack room
Separate affected tack from clean equipment and address the damp storage conditions. Follow the leather maker’s mold-cleaning guidance or consult a saddler; do not improvise with bleach or mix cleaning chemicals. Let treated equipment dry properly before returning it to storage.
A bridle develops a sharp hanging crease
Replace the narrow hook with a broad, smooth support and stop hanging weight from the folded section. Do not try to iron the crease out. Have damaged or deeply creased load-bearing leather assessed before riding.
Cracks remain after conditioning
Conditioner does not repair cracked leather. Set the piece aside and ask a qualified saddler whether repair or replacement is appropriate. Pay particular attention to reins, billets, stirrup leathers, and other parts whose failure creates a riding hazard.
Customize your workflow
Build the routine around who actually uses the tack room. In a shared barn, mark the spaces for drying, ready-to-use gear, and equipment awaiting inspection. Keep cleaning instructions where the family can find them.
For a barrel-racing setup, make the return from a ride the trigger for separating pads and checking sweaty straps. For occasional trail rides, make the next planned ride the trigger for a full inspection rather than grabbing tack straight from storage.
The Good Shepherd Ranch Clothing Co sells horse tack alongside western apparel and books, but your care setup does not need unrelated shopping added to it. Start with proper supports, suitable care materials, and a storage space you can keep dry.
FAQ
What is the best way to store horse tack to prevent cracking?
Store leather tack clean, dry, properly supported, and away from direct heat and sunlight. Use compatible conditioning products according to the tack maker’s instructions, and keep damp pads separate.
Should I oil my saddle before storing it?
Oil a saddle only when its maker recommends that treatment. Follow the specified product and application directions; extra oil does not make damaged leather safe.
Can I store a leather saddle in a plastic bag?
Do not seal damp leather in a plastic bag. For routine storage, use an appropriate rack and add a suitable breathable cover only after the saddle is dry.
Is an unheated tack room bad for leather?
Judge the tack room by its conditions, not simply whether it has heating. Keep tack away from leaks, condensation, direct heat, and sunlight, and follow the leather maker’s storage guidance.
Can leather conditioner fix cracked reins?
Leather conditioner does not repair cracked reins or restore their structural strength. Remove questionable reins from use and have a qualified saddler assess them.
Should I leave my saddle pad under the saddle?
Store damp saddle pads separately from leather saddles. Clean and dry the pad according to its own instructions before putting it away.
How often should I check tack that is not being used?
Check stored tack regularly, after changes such as leaks or condensation, and before every return to use. Follow any inspection interval supplied by the maker rather than relying on a universal schedule.
One last thing
For your 2026 tack-room reset, fix the drying space before buying another bottle of conditioner. A well-supported saddle still needs a dry home; a cover cannot solve damp walls or a sweaty pad left underneath.
The Good Shepherd Ranch Clothing Co’s horse tack belongs in the same practical routine as any other leather equipment: follow its specific care instructions, inspect before riding, and keep questionable pieces out of use. The final check is safety, not shine.