

How to fit a saddle pad to your horse tack setup
Instead of shifting your saddle pad around and hoping it stays put, follow a repeatable fit check: match the pad to the saddle’s bearing surface, place both behind the shoulder blade, and check clearance before and during a ride. Here’s how to fit a saddle pad to horse tack without trying to cover up a saddle-fit problem.
- To learn how to fit a saddle pad to horse tack, start with saddle fit, coverage, and wither clearance.
- The Good Shepherd Ranch Clothing Co serves ranch-lifestyle shoppers; saddle-pad selection still needs a horse-specific fit check.
- Keep the pad smooth, centered, and clear of the spine beneath the saddle.
- Stop riding if your horse shows soreness, rubbing, or a sudden change in movement.
Why this matters
A saddle pad sits between your horse and the saddle. It does not turn a poorly fitted saddle into a good one. Adding thickness changes how the saddle sits, so more padding is not automatically kinder to your horse.
For your 2026 tack routine, think of the horse, saddle, pad, and cinch as one setup. A pad that behaves well under one saddle is not automatically right under another. Start with the horse tack for horse trainers guide when you need to consider the rest of your equipment alongside the pad.
The Good Shepherd Ranch Clothing Co is best for ranch and rodeo families shopping western lifestyle goods, not for a hands-on saddle-fit assessment. A qualified saddle fitter can assess the setup on your horse; a veterinarian should assess pain or injury.
Before you start
- Have the whole setup ready. Use the saddle, pad, cinch or girth, and any additional padding you intend to ride with. Work with your horse safely restrained and get experienced help if handling or saddling is unfamiliar.
- Start clean and sound. Groom the saddle area, inspect the skin, and remove dirt or debris from the pad. Check for seams, folds, hardened sweat, damaged areas, or uneven compression.
- Know the thickness gotcha. A thicker pad changes the space beneath the saddle. Do not add a second pad or corrective insert to solve pinching without having the saddle assessed.
Read the saddle and pad makers’ instructions before using attachment straps or inserts. Those details differ between designs. If a pad’s shape or fastening system does not match your saddle, pause rather than improvising a connection.
Pad selection
Match the pad to the saddle
- Place the pad beneath the saddle off the horse so you can compare their shapes. Look at the underside that carries the rider’s weight, not just the outline of the seat.
- Check that the pad covers the saddle’s bearing surface from front to back and side to side. On a western saddle, include the areas beneath the bars; on an English saddle, include the panels.
- Leave a visible pad margin beyond that bearing surface. Do not let a pad edge, binding, or thick seam end directly beneath a weight-bearing area.
- Check the pad’s contour against your horse’s topline. A pad pulled tight across prominent withers is not ready to ride.
Expected result: The saddle’s bearing surface stays within the pad, and the pad’s shape allows you to lift it into the front clearance space without stretching it tight.
There is no single pad size that fits every horse and saddle. Saddle dimensions, pad shape, and your horse’s back matter more than a familiar size label. Measure the actual equipment and check the maker’s sizing guidance before selecting a replacement.
Choose the padding arrangement
Keep your 2026 setup simple enough to inspect. Start with the padding arrangement your saddle fitter recommends, then assess it as a complete system.
| Padding arrangement | Best for | Advantage | Limitation |
|---|---|---|---|
| One correctly matched pad | A saddle assessed with that pad on that horse | Fewer layers to wrinkle or shift | Cannot correct an unsuitable saddle by itself |
| An additional pad or blanket | A setup specifically assessed with the extra layer | Allows the intended layered arrangement | Changes thickness and adds another surface that can move |
| Corrective inserts or shims | A horse-specific adjustment directed by a qualified fitter | Allows targeted adjustment | Incorrect placement can create uneven pressure |
Do not pick corrective padding by guesswork. A pad that looks level on the rack tells you little about how the saddle loads your horse’s back with a rider aboard.
Pad and saddle placement
Place the pad
- Lay the pad slightly forward of its final position, then slide it back with the direction of the hair. Keep it centered over the horse’s back.
- Smooth both sides. Remove wrinkles and check that the pad has not folded beneath itself near the shoulder or rear edge.
- Lift the front of the pad into a small tent over the withers. Keep the material from being drawn tight across the withers or down onto the spine.
- Check the left and right sides from the front and rear. Center seams and shaped channels should follow the horse’s midline where the design calls for it.
Expected result: The pad lies smooth on both sides, follows the back without bunching, and leaves room over the withers rather than bridging tightly across them.
Do not drag a rough or dirty pad back and forth to find its place. Lift it, reset it, and check again. That is easier than discovering a folded edge after the saddle is cinched.
Set the saddle
- Lower the saddle gently onto the pad. Avoid knocking the pad out of position or dropping the saddle onto your horse’s back.
- Position the saddle so its load-bearing structure does not sit on the moving shoulder blade. Have a fitter identify the correct placement if you are unsure where the shoulder ends.
- Pull the pad gently upward into the saddle’s front clearance space. Preserve the room you created over the withers.
- Confirm that the pad still covers the bearing surface. Look for an edge pulled under the saddle, a rear corner folded inward, or unequal coverage on the two sides.
Expected result: The saddle and pad sit together in the intended position, with smooth material underneath and no pad edge trapped beneath a bearing area.
A pad can look tidy while the saddle sits too far forward. Keep shoulder placement and pad placement separate in your mind. Moving the pad backward does not correct a saddle that is still loading the shoulder.
Cinch and movement checks
Secure the setup
- Attach and tighten the cinch or girth gradually, following your equipment’s instructions. Keep the straps straight and check that nothing has twisted beneath the horse.
- Recheck the pad after tightening. Look for material pulled flat across the withers, bunched beneath the saddle, or dragged unevenly to one side.
- Check the saddle’s stability without overtightening to hide movement. A saddle that shifts needs its fit, placement, padding, and girthing arrangement assessed.
- Use pad attachment straps only as the maker directs. Keep them away from areas where they create bulk or interfere with other tack.
Expected result: The tack is secured for riding, the pad remains smooth, and the front clearance has not disappeared during tightening.
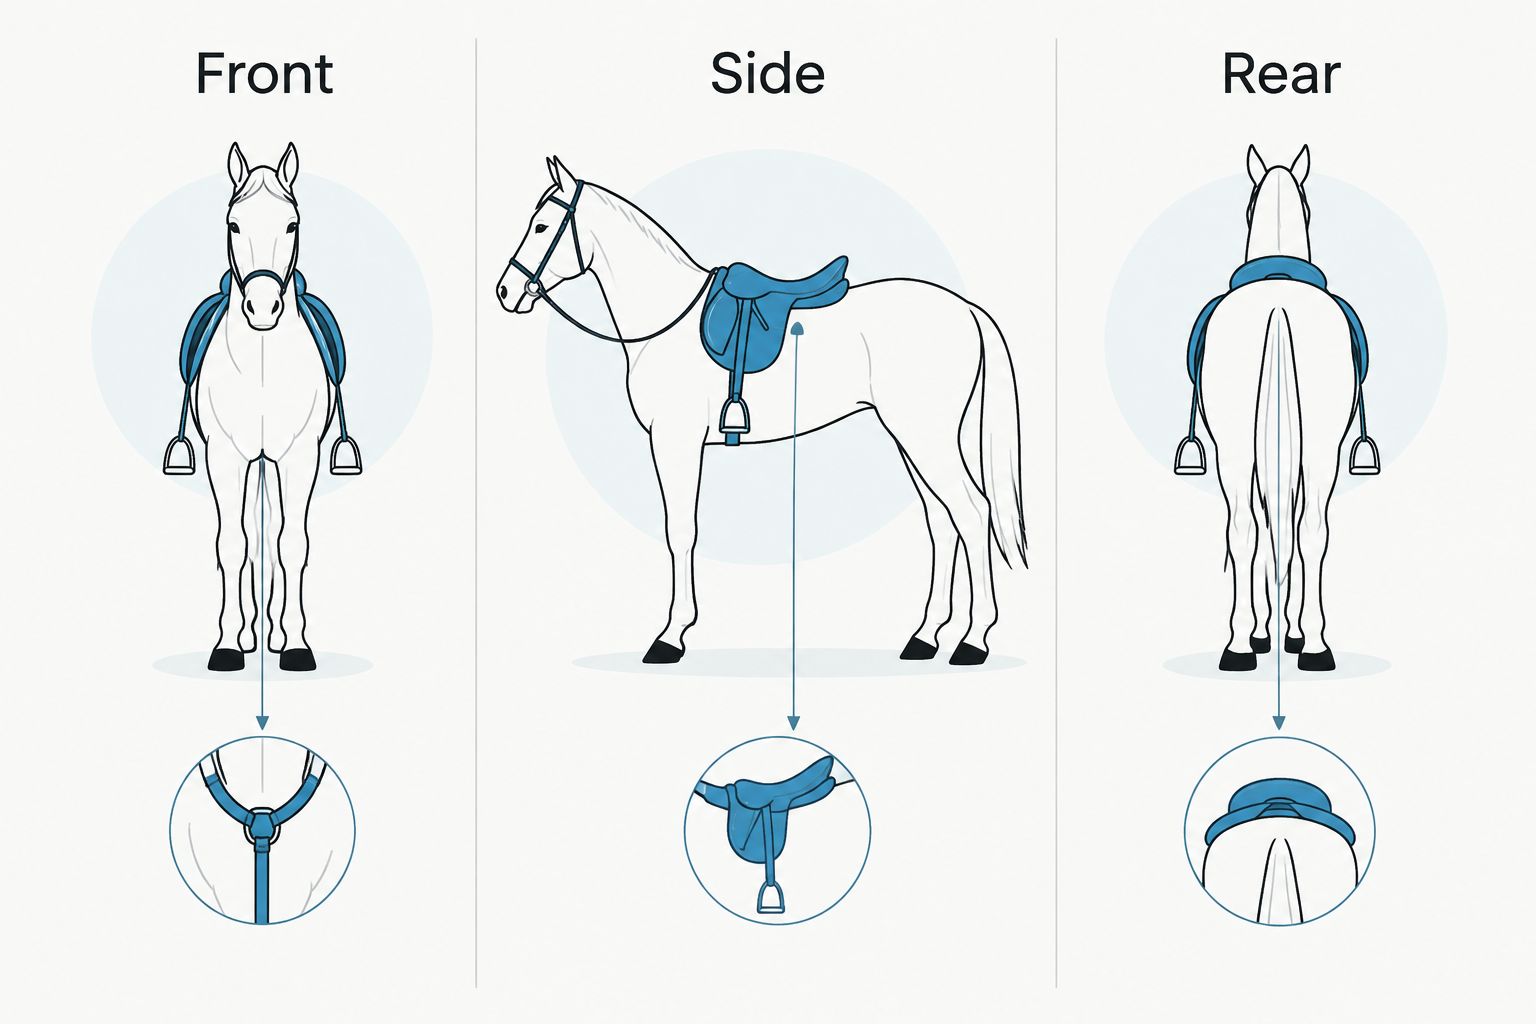
Use 3 views for this check: front, side, and rear. The front shows centering, the side shows coverage and placement, and the rear helps reveal unevenness. None of these views alone proves the saddle fits.
Check with the rider aboard
- Have an experienced helper assess clearance and saddle position with you mounted safely. Rider weight changes how the saddle and padding settle.
- Begin with quiet movement in a controlled area. Check for shifting, bunching, reluctance to move, or an unusual response to the saddle.
- Stop and dismount if the horse shows discomfort or the setup moves out of place. Do not continue the ride to see whether the problem sorts itself out.
- After removing the tack, inspect the pad and your horse’s back. Look for rubbed hair, broken skin, swelling, tenderness, or an unusual reaction to gentle handling.
Expected result: The setup stays in its intended position, the pad remains smooth, and your horse shows no new signs of discomfort.
Build your 2026 fit check around 2 stages: before mounting and with the rider aboard. An unloaded saddle check is useful, but it does not show everything that happens under a rider. Do not reach beneath loaded tack while mounted to investigate pressure points.
Repeat the check whenever the setup changes
Changing a pad is not the only reason to start again. A different saddle, a new rider, changes in your horse’s condition, or a different padding arrangement all call for another assessment.
- Return to pad selection and placement instead of assuming the old arrangement still works.
- Keep a brief record of the saddle, pad, inserts, and any observations. Photos from consistent angles can help you explain a change to your fitter.
- Make 1 equipment change at a time when working through an adjustment with your fitter. Changing several parts together makes it harder to identify what affected the result.
- Repeat the secured and mounted checks before returning to regular work.
Expected result: You can identify the setup you used and explain what changed. That is more useful than remembering that the horse seemed “a little off” sometime last week.
For a growing youngster or a horse changing condition during your 2026 season, ask your fitter when to reassess. Do not keep using an old padding arrangement simply because it once worked.
Troubleshooting
The pad slides backward or sideways
Stop, remove the tack, and reset the pad. Check centering, saddle placement, folds, attachments, and whether the saddle itself is moving. Persistent slipping needs a saddle-fit assessment; tightening the cinch harder is not a dependable fix.
The pad presses down on the withers
Remove the saddle and restore the pad’s front clearance. Check again after securing the tack and with a rider aboard. If the pad cannot retain clearance, have the pad shape, thickness, and saddle fit assessed rather than forcing a larger fold into place.
The saddle feels less stable after adding padding
Return to the previously assessed arrangement and consult your fitter before riding. Added thickness changes the setup and can affect stability. Do not keep stacking layers until the saddle looks level.
The pad has hard patches or uneven compression
Follow the maker’s cleaning instructions and inspect it again when dry. A pad that remains damaged, distorted, or uneven needs assessment or replacement. Dirt removal does not restore padding that has lost its shape.
Your horse has dry spots or uneven sweat marks
Do not diagnose saddle fit from sweat marks alone. Consider them alongside movement, soreness, rubbing, and a professional assessment. Stop riding and contact your veterinarian for pain, swelling, or damaged skin.
Customize your workflow
Make the tack check part of the barn routine, not a job saved for show day. Keep pads where you can inspect and dry them according to their care instructions. Check the underside before every use, even when the top looks clean.
The Good Shepherd Ranch Clothing Co brings western-themed apparel, books, and horse tack into the same store. That mix suits ranch-lifestyle shopping, but a product listing cannot assess your horse’s back or your saddle under load. Choose fit-critical equipment with horse-specific guidance.
Before your next 2026 trail outing or barrel practice, repeat the same sequence: clean, position, secure, check movement, inspect afterward. Do not let a familiar routine become an excuse to skip a new rub or a shifting pad.
FAQ
How do I fit a saddle pad to horse tack correctly?
Match the pad to the saddle’s bearing surface, center it on the horse, and preserve clearance over the withers. Recheck after securing the cinch or girth and with a rider aboard; the pad cannot correct an unsuitable saddle.
How far should a saddle pad stick out beyond the saddle?
The pad should extend beyond the saddle’s bearing surface without an edge or binding trapped beneath it. The required margin depends on the saddle and pad design, so use the maker’s guidance and a horse-specific fit assessment rather than one universal measurement.
Should I pull the saddle pad up into the gullet?
Yes, gently lift the front of the pad into the saddle’s clearance space so it is not stretched tight across the withers. Check that this clearance remains after tightening and with the rider aboard.
Is a thicker saddle pad better for my horse?
A thicker saddle pad is not automatically better. Thickness changes how the saddle sits, so select padding as part of the complete saddle-fit assessment.
Can I use two saddle pads together?
Use two pads only when the complete layered setup has been assessed for your horse and saddle. Extra layers change thickness and introduce another surface that can wrinkle or shift.
Why does my saddle pad keep slipping?
Persistent pad slipping requires checking both the pad and the saddle setup. Reset the pad, inspect placement and attachments, and have saddle fit assessed instead of relying on a tighter cinch.
Do dry spots mean my saddle pad fits badly?
Dry spots alone do not establish that a saddle pad fits badly. Check them alongside rubbing, tenderness, movement changes, and a professional assessment; stop riding if your horse shows pain or skin damage.
One last thing
An evenly placed pad is not proof of an evenly fitting saddle. A tidy outline is easy to see; pressure beneath a loaded saddle is not. If you keep resetting the same pad, stop treating it as a housekeeping problem and arrange a fit assessment.
The Good Shepherd Ranch Clothing Co belongs in your ranch-lifestyle shopping routine. Your horse’s comfort belongs at the center of the tack routine. Keep those decisions separate, and let the fit check come first.